

Why You’ll Love This Strawberry Danish Recipe
This Strawberry Danish Recipe is the kind of pastry that feels special without being out of reach for a home cook. It has a flaky base, a creamy center, bright fruit on top, and just enough sweetness to make it perfect for breakfast, brunch, or a coffee break treat. If you like recipes that can be prepped ahead for a busy morning, this one fits right in.
- Easy enough for planning ahead: The dough rests overnight, so most of the work happens before baking day. That makes the Strawberry Danish Recipe a smart choice for weekends, holidays, or any morning when you want something fresh from the oven without rushing.
- Bright, fresh flavor: Cream cheese, lemon zest, strawberry jam, and fresh strawberries create a balanced filling that tastes lively and comforting at the same time. A quick read on the health benefits of strawberries also shows why this fruit is such a popular choice in homemade pastries.
- Flexible for different kitchens: Homemade Danish dough gives the best texture, but frozen puff pastry works well when you need a shortcut. That makes this recipe a good fit for busy parents, students, and anyone baking on a tighter schedule.
- Beautiful bakery-style finish: The egg wash and demerara sugar create a shiny, golden top with a little crunch. The look is just as inviting as the taste, which makes this pastry great for sharing at gatherings.
If you plan ahead and let the dough rest overnight, you’ll find making these Danish pastries much easier, and the flaky, buttery layers will be absolutely worth the wait.
For another make-ahead breakfast idea, you may also enjoy air fryer yogurt custard toast, which has the same cozy, shareable feel.
Jump to:
- Why You’ll Love This Strawberry Danish Recipe
- Essential Ingredients for Strawberry Danish Recipe
- Main Ingredients
- Ingredient Notes and Helpful Swaps
- Special Dietary Options
- How to Prepare the Perfect Strawberry Danish Recipe: Step-by-Step Guide
- First Step: Plan Ahead and Rest the Dough
- Second Step: Preheat the Oven and Prepare the Trays
- Third Step: Roll and Cut the Dough
- Fourth Step: Shape the Danish Pastries
- Fifth Step: Mix the Cream Cheese Filling
- Sixth Step: Fill Each Pastry
- Seventh Step: Add the Strawberries and Finish the Tops
- Eighth Step: Bake Until Golden
- Final Step: Cool and Serve
- Dietary Substitutions to Customize Your Strawberry Danish Recipe
- Protein and Main Component Alternatives
- Vegetable, Sauce, and Seasoning Modifications
- Mastering Strawberry Danish Recipe: Advanced Tips and Variations
- Pro Cooking Techniques
- Flavor Variations
- Presentation Tips
- Make-Ahead Options
- How to Store Strawberry Danish Recipe: Best Practices
- Refrigeration
- Freezing
- Reheating
- Meal Prep Considerations
- Quick Recipe Details
- FAQs: Frequently Asked Questions About Strawberry Danish Recipe
- Can I use puff pastry instead of making Danish dough from scratch for strawberry Danish?
- Can I use frozen strawberries in a strawberry Danish recipe?
- How do I store leftover strawberry Danish pastries?
- Can I freeze strawberry Danish dough or assembled pastries?
- How can I prevent the bottoms of strawberry Danish pastries from burning?
- Strawberry Danish Recipe
- Ingredients
- Instructions
- Last Step:
- Notes
- Nutrition
- Did you make this recipe?
Essential Ingredients for Strawberry Danish Recipe
To make the best Strawberry Danish Recipe, gather every ingredient before you begin. Using precise amounts helps the filling stay balanced and keeps the pastry from getting soggy.
Main Ingredients
- Danish dough, homemade preferred: This gives the pastry its tender, layered structure. Frozen puff pastry can be used for a faster version, though the texture will be a little different.
- 125 g full-fat cream cheese, softened: This creates the creamy filling and gives the Danish a rich, smooth center.
- 1 tablespoon granulated white sugar: Adds sweetness to the cream cheese mixture without overpowering the strawberries.
- 2 teaspoons milk: Helps loosen the filling so it spreads easily.
- Zest of half a small lemon: Brings a fresh, bright note that balances the sweetness.
- 1/4 cup good quality strawberry jam: Adds fruity flavor and extra moisture in the center of each pastry.
- 12 small fresh strawberries, cut into small pieces: Fresh berries give the best texture and color on top.
- 1 egg yolk mixed with a dash of water: Used as egg wash for a shiny, golden finish.
- 1 teaspoon demerara sugar: Sprinkled over the edges for sparkle and crunch.
Ingredient Notes and Helpful Swaps
| Ingredient | Why It Matters | Possible Swap |
|---|---|---|
| Danish dough | Creates classic layered pastry texture | Frozen puff pastry for a quicker shortcut |
| Full-fat cream cheese | Makes a smooth, rich filling | Light cream cheese for a lighter result |
| Strawberry jam | Boosts fruit flavor and sweetness | Chia cherry jam for a different fruit twist |
| Fresh strawberries | Give fresh texture and bright color | Best not to replace with frozen fruit for this recipe |
Special Dietary Options
Vegan: Use vegan puff pastry, plant-based cream cheese, and a dairy-free milk alternative. Replace the egg wash with plant milk brushed on the edges, though the shine will be softer.
Gluten-free: Use a gluten-free puff pastry or a gluten-free laminated dough made for pastries. Check that the jam and cream cheese are gluten-free as well.
Lower-sugar: Use a reduced-sugar strawberry jam and cut back the demerara sugar on top. You can also use a lightly sweetened cream cheese filling.
How to Prepare the Perfect Strawberry Danish Recipe: Step-by-Step Guide
First Step: Plan Ahead and Rest the Dough
Start the day before you want to bake. Prepare your Danish pastry dough and let it rest for at least 8 to 10 hours. That overnight rest gives the dough time to develop the texture you want, especially if you are making it from scratch. If you are using puff pastry instead, thaw it fully before rolling so it stays easy to handle.
If you enjoy make-ahead breakfast treats, this same planning style works well for recipes like homemade cheese scones, which also travel well for sharing.
Second Step: Preheat the Oven and Prepare the Trays
When you are ready to bake, preheat the oven to 200°C, which is 395°F, or 180°C fan forced. Line baking trays with paper so the pastries release easily and brown evenly. This small step keeps cleanup simple too.
Third Step: Roll and Cut the Dough
On a lightly floured surface, roll the dough to about 30 by 40 cm. Trim the edges so the shape is even. Then cut the dough into 12 large squares, each about 10 cm, or 20 smaller squares, each about 8 cm. The larger size gives you a bigger pastry with more filling, while the smaller size is nice for brunch platters or parties.
Fourth Step: Shape the Danish Pastries
Place the squares on the lined trays. Dab a small amount of water in the center of each square, then fold all four corners toward the center. Press down lightly to form a dent in the middle. Rest the shaped pastries for 10 to 15 minutes. This short pause helps the dough relax before baking.
Fifth Step: Mix the Cream Cheese Filling
Beat the softened cream cheese with 1 tablespoon granulated white sugar, 2 teaspoons milk, and the zest of half a small lemon until the mixture is smooth. The filling should be soft enough to spoon but not runny. If the cream cheese is still cold, it will stay lumpy, so let it soften fully before mixing.
Sixth Step: Fill Each Pastry
Place 1/2 to 1 teaspoon strawberry jam into the dent of each pastry. Then top the jam with 1 to 2 teaspoons of the cream cheese mixture and spread it gently over the jam. Add the cream cheese in small amounts so it does not spill over the edges during baking. This is the best way to keep the Strawberry Danish Recipe neat and bakery-style.
Seventh Step: Add the Strawberries and Finish the Tops
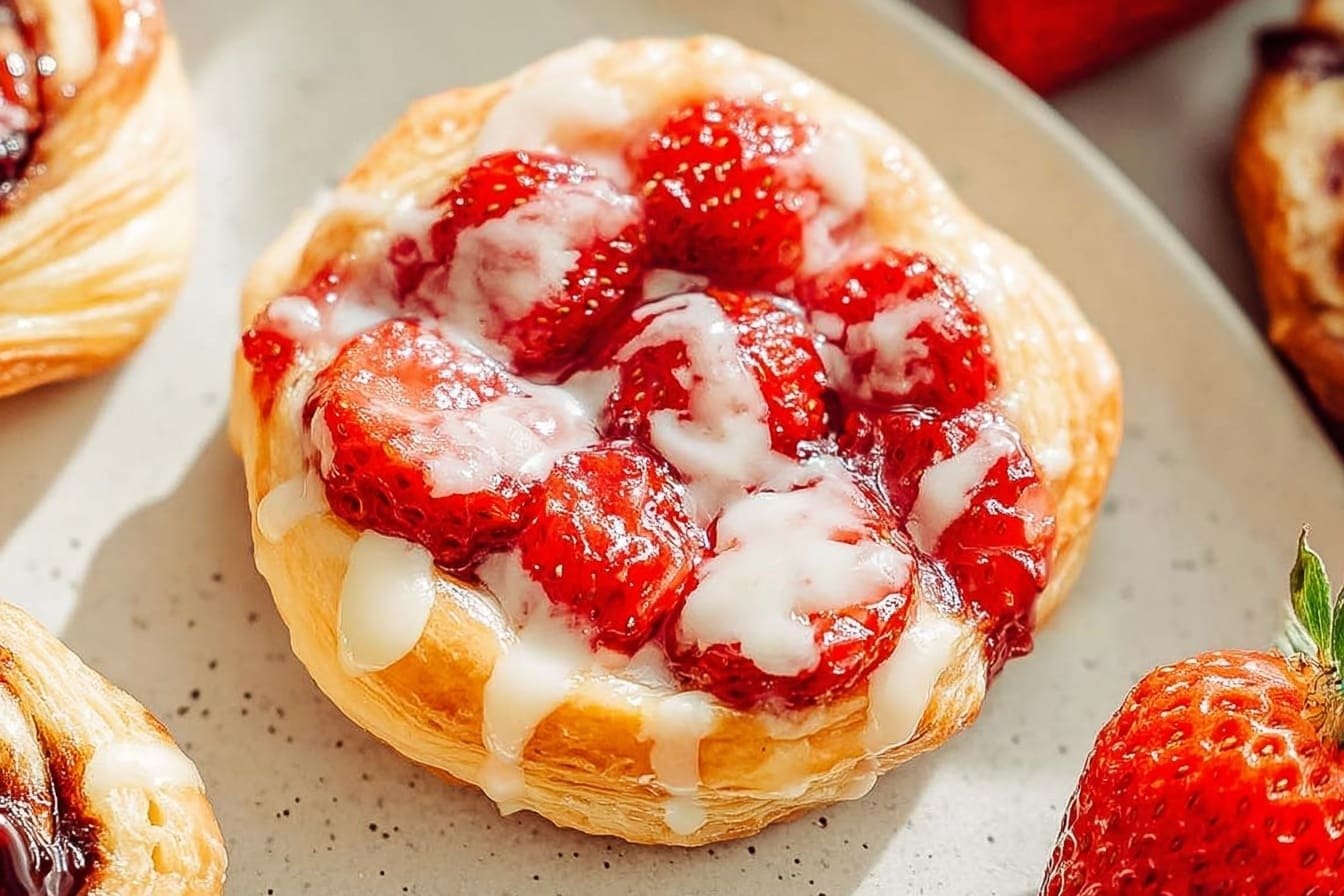
Scatter the fresh strawberry pieces over the cream cheese layer. Brush the edges with the egg wash made from 1 egg yolk mixed with a dash of water. Sprinkle 1 teaspoon demerara sugar over the tops and edges for a light crunch and a golden finish.
Use fresh strawberries only. They keep their shape better and give the pastries a brighter look than frozen fruit.
Eighth Step: Bake Until Golden
Bake for 18 to 22 minutes, or until the pastries are golden and lightly puffed. Rotate the trays after about 10 minutes so they brown evenly. Since ovens can vary, watch closely near the end of baking. The tops should look glossy, the edges should be deep golden, and the bottoms should be cooked through.
Final Step: Cool and Serve
Let the Danish pastries cool for a few minutes before serving. They are lovely warm, when the filling is soft and the pastry still has a little crispness. If you are serving them for a brunch table, arrange them on a platter and pair them with coffee, tea, or even a simple fruit salad. For another sweet brunch idea, try fluffy Japanese souffle pancakes for a special weekend spread.
Dietary Substitutions to Customize Your Strawberry Danish Recipe
Protein and Main Component Alternatives
Although this recipe is built around cream cheese and pastry dough, you can adjust it for different needs. For a dairy-free version, use a plant-based cream cheese that softens well and has a mild flavor. If you want to lower the fat a bit, choose reduced-fat cream cheese, though the filling will be slightly less rich.
For the pastry itself, frozen puff pastry is the quickest alternative to homemade Danish dough. It gives a flakier, crisper bite and is helpful when you need a shortcut for a potluck, school event, or church gathering. Just keep in mind that the final pastry will not have the same soft, yeasted layers as traditional Danish dough.
Vegetable, Sauce, and Seasoning Modifications
This Strawberry Danish Recipe is already fruit-forward, but you can still change the flavor profile. Swap the strawberry jam for another fruit spread if you like, such as cherry or raspberry. Add a little vanilla to the cream cheese mixture if you want a sweeter bakery taste, or use extra lemon zest for a brighter finish.
If you are cutting back on sugar, reduce the jam slightly and skip some of the demerara sugar on top. The pastries will still taste wonderful thanks to the cream cheese, berries, and buttery dough. Just remember that the fresh strawberries should stay in the recipe whenever possible, since they give the pastry its best color and texture.
Mastering Strawberry Danish Recipe: Advanced Tips and Variations
Pro Cooking Techniques
Small details make a big difference with this pastry. Make sure the dough is rolled evenly so the squares bake at the same pace. Keep the cream cheese fully softened before mixing, which helps prevent lumps in the filling. If your kitchen is warm, chill the shaped pastries briefly before baking so the layers hold their shape.
When baking, place the trays in the center of the oven and rotate them once halfway through. This helps the pastries brown more evenly. If your oven runs hot, check early so the edges do not darken too quickly.
Flavor Variations
For a new twist, mix a little almond extract into the cream cheese filling, or use orange zest instead of lemon. You can also sprinkle sliced almonds over the top before baking for extra crunch. Another easy variation is to use a different fruit jam under the cream cheese, then finish with the fresh strawberries for a mixed-berry feel.
Presentation Tips
For a pretty finish, dust the cooled pastries lightly with powdered sugar or serve them on a white platter with extra sliced strawberries. A little mint leaf on the side can make the plate look fresh and festive. If you are packing them for a picnic or potluck, place parchment between layers so the tops stay neat.
Make-Ahead Options
To save time, shape the dough and freeze it before assembly, or freeze assembled pastries without the strawberries. That way you can bake from frozen when needed. This is a helpful trick for busy weeks, holiday brunches, or any day you want fresh pastry without starting from scratch.
For another make-ahead breakfast-friendly recipe, the cheesecake stuffed French toast loaf is another cozy crowd-pleaser that fits gatherings well.
How to Store Strawberry Danish Recipe: Best Practices
Refrigeration
Store leftover Strawberry Danish pastries in an airtight container in the refrigerator for up to 3 days. This helps keep the cream cheese filling safe and the berries from softening too much. If possible, let them cool fully before storing so excess steam does not make the pastry soggy.
Freezing
You can freeze shaped dough before assembly or assembled pastries without the strawberries for up to 3 months. Wrap them well or place them in a freezer-safe bag or container. If baking from frozen, extend the baking time a little and watch the color carefully near the end.
Reheating
Reheat the pastries before serving so the crust regains some crispness. A 350°F oven for 8 to 10 minutes works well for leftovers. You can also use a microwave for a very quick warm-up, but the pastry will soften more. If you froze the pastries, thaw them in the fridge first if time allows.
Meal Prep Considerations
This recipe works well for batch baking because you can prepare the dough ahead of time and bake only what you need. It is a smart choice for holiday mornings, brunch trays, and community breakfasts. The pastries travel well once cooled, which makes them useful for potlucks and church events.
Quick Recipe Details
| Detail | Information |
|---|---|
| Active prep time | About 45 minutes |
| Baking time | 18 to 22 minutes |
| Dough resting time | 8 to 10 hours, ideally overnight |
| Total hands-on time | About 1 hour 5 minutes active, plus resting |
| Yield | 12 large Danish pastries or 20 smaller ones |
| Calories | About 217 calories per pastry |

FAQs: Frequently Asked Questions About Strawberry Danish Recipe
Can I use puff pastry instead of making Danish dough from scratch for strawberry Danish?
Yes, store-bought puff pastry works well as a shortcut for strawberry Danish pastries. Thaw it completely before using, then roll it out slightly to the recipe’s dimensions. Cut, fill, and shape as directed. The result will be flakier and crispier throughout compared to traditional Danish dough, which has a softer interior from lamination with yeast. Bake at 400°F for 15-20 minutes until golden. This swap saves hours of prep time while still delivering a delicious treat. Brush with egg wash for shine and a professional look. Pair with a simple glaze of powdered sugar, milk, and vanilla drizzled after cooling. Perfect for beginners or quick baking sessions. (87 words)
Can I use frozen strawberries in a strawberry Danish recipe?
Fresh strawberries are best for strawberry Danish because they hold their shape, release less water during baking, and provide vibrant color and texture. Frozen strawberries thaw and become mushy, leading to soggy pastries and unappealing appearance. If fresh aren’t available, thaw frozen ones completely, drain excess liquid thoroughly, pat dry with paper towels, and chop finely. Reduce any added sugar in the recipe by 1-2 tablespoons to account for natural sweetness. For topping, macerate briefly with sugar and lemon juice right before assembly. Always add them post-bake or just before serving to avoid excess moisture. This keeps your Danish firm and bakery-fresh. (98 words)
How do I store leftover strawberry Danish pastries?
Store leftover strawberry Danish in an airtight container in the refrigerator for up to 3 days to maintain freshness and prevent sogginess from the fruit. Avoid leaving them at room temperature longer than 2 hours due to dairy filling and fresh berries. For reheating, let them sit out for 30 minutes to reach room temperature, then warm in a 350°F oven for 8-10 minutes until the pastry crisps up and filling is gooey. Microwave for 15-20 seconds as a quick option, but it may soften the exterior. Freeze extras (without fresh topping) for up to 1 month—thaw overnight in fridge before reheating. Label containers with dates for easy tracking. (102 words)
Can I freeze strawberry Danish dough or assembled pastries?
Yes, freeze strawberry Danish dough after the final roll and fold: wrap tightly in plastic wrap, then foil or a freezer bag, for up to 3 months. Thaw overnight in the fridge before shaping and baking. For assembled but unbaked pastries, fill with cream cheese mixture (skip fresh strawberries), place on a parchment-lined tray to freeze solid, then transfer to an airtight bag for up to 3 months. Bake from frozen at 375°F, adding 5-10 extra minutes—check for golden edges. Add sliced fresh strawberries and glaze right after baking for best results. This method lets you prep ahead for effortless fresh-baked Danish anytime. (109 words)
How can I prevent the bottoms of strawberry Danish pastries from burning?
To avoid burnt bottoms on strawberry Danish, lower oven temp by 25°F (e.g., from 400°F to 375°F) and extend bake time slightly while monitoring closely. Position the tray on the upper-middle rack for even heat. Use heavy-duty, light-colored aluminum pans or stack two sheets to insulate. A silicone baking mat or parchment paper diffuses direct heat effectively. Rotate the tray halfway through baking. If edges brown too fast, tent loosely with foil. Preheat oven fully and avoid overcrowding for air circulation. Test doneness by tapping for a hollow sound. These steps ensure flaky, evenly baked pastries every time without compromising the juicy strawberry topping. (105 words)

Strawberry Danish Recipe
🍓 Indulge in flaky golden pastries stuffed with velvety cream cheese, sweet strawberry jam, and fresh berries for a burst of fruity freshness in every bite!
🥐 Perfect for brunch or dessert, this step-by-step recipe yields bakery-style danishes with minimal fuss using simple ingredients and resting time.
- Total Time: 10 hours 65 minutes
- Yield: 12 pastries
Ingredients
– Danish dough, homemade preferred
– 125 g full-fat cream cheese, softened
– 1 tablespoon granulated white sugar
– 2 teaspoons milk
– Zest of half a small lemon
– 1/4 cup good quality strawberry jam
– 12 small fresh strawberries, cut into small pieces
– 1 egg yolk mixed with a dash of water
– 1 teaspoon demerara sugar
Instructions
1-First Step: Plan Ahead and Rest the Dough Start the day before you want to bake. Prepare your Danish pastry dough and let it rest for at least 8 to 10 hours. That overnight rest gives the dough time to develop the texture you want, especially if you are making it from scratch. If you are using puff pastry instead, thaw it fully before rolling so it stays easy to handle.
2-Second Step: Preheat the Oven and Prepare the Trays When you are ready to bake, preheat the oven to 200°C, which is 395°F, or 180°C fan forced. Line baking trays with paper so the pastries release easily and brown evenly. This small step keeps cleanup simple too.
3-Third Step: Roll and Cut the Dough On a lightly floured surface, roll the dough to about 30 by 40 cm. Trim the edges so the shape is even. Then cut the dough into 12 large squares, each about 10 cm, or 20 smaller squares, each about 8 cm. The larger size gives you a bigger pastry with more filling, while the smaller size is nice for brunch platters or parties.
4-Fourth Step: Shape the Danish Pastries Place the squares on the lined trays. Dab a small amount of water in the center of each square, then fold all four corners toward the center. Press down lightly to form a dent in the middle. Rest the shaped pastries for 10 to 15 minutes. This short pause helps the dough relax before baking.
5-Fifth Step: Mix the Cream Cheese Filling Beat the softened cream cheese with 1 tablespoon granulated white sugar, 2 teaspoons milk, and the zest of half a small lemon until the mixture is smooth. The filling should be soft enough to spoon but not runny. If the cream cheese is still cold, it will stay lumpy, so let it soften fully before mixing.
6-Sixth Step: Fill Each Pastry Place 1/2 to 1 teaspoon strawberry jam into the dent of each pastry. Then top the jam with 1 to 2 teaspoons of the cream cheese mixture and spread it gently over the jam. Add the cream cheese in small amounts so it does not spill over the edges during baking. This is the best way to keep the Strawberry Danish Recipe neat and bakery-style.
7-Seventh Step: Add the Strawberries and Finish the Tops Scatter the fresh strawberry pieces over the cream cheese layer. Brush the edges with the egg wash made from 1 egg yolk mixed with a dash of water. Sprinkle 1 teaspoon demerara sugar over the tops and edges for a light crunch and a golden finish.
8-Eighth Step: Bake Until Golden Bake for 18 to 22 minutes, or until the pastries are golden and lightly puffed. Rotate the trays after about 10 minutes so they brown evenly. Since ovens can vary, watch closely near the end of baking. The tops should look glossy, the edges should be deep golden, and the bottoms should be cooked through.
9-Final Step: Cool and Serve Let the Danish pastries cool for a few minutes before serving. They are lovely warm, when the filling is soft and the pastry still has a little crispness.
Last Step:
Please leave a rating and comment letting us know how you liked this recipe! This helps our business to thrive and continue providing free, high-quality recipes for you.Notes
😴 Rest the dough overnight for the best flaky texture.
🧀 Fully soften cream cheese for a smooth, lump-free filling.
🍓 Avoid overfilling to prevent spills during baking.
- Prep Time: 45 minutes
- Dough Rest Time: 10 hours
- Cook Time: 20 minutes
- Category: Breakfast
- Method: Baked
- Cuisine: Danish
- Diet: Vegetarian
Nutrition
- Serving Size: 1 pastry
- Calories: 217 kcal


