

No Bake Oreo Cheesecake
No bake Oreo cheesecake is the dessert I bring when I want everyone at the table to ask for the recipe before the plates are cleared.
It starts with a buttery Oreo crust, then a filling whipped until it looks like a soft mousse and studded with cookie pieces. Crushed Oreos go into both layers, so every bite tastes like cookies and cream.
The best part is that the oven stays off. The crust firms up in the refrigerator and the filling sets into a rich, creamy slice without a single minute of baking. That makes it a dependable choice for potlucks, birthday tables, and warm afternoons when turning on the oven sounds like extra work.

This is one of my most trusted no bake cheesecake recipes. I have made it again and again for church suppers and family cookouts, and it comes out smooth and creamy every time.
The recipe makes 12 slices in an 8 or 10 inch springform pan, and the hands on work takes about 20 minutes before the refrigerator does the rest. Each slice comes in around 734 calories, so it is a treat worth savoring slowly.
| Recipe at a glance | Detail |
|---|---|
| Prep time | 20 minutes |
| Chilling time | 4 hours |
| Total time | 4 hours 20 minutes |
| Servings | 12 slices |
| Pan | 8 or 10 inch springform pan |
Jump to:
- No Bake Oreo Cheesecake
- Why you’ll love this recipe
- Ingredients for no bake Oreo cheesecake
- Tips for this recipe
- How to make no bake Oreo cheesecake
- Recipe Variations
- Recipe Questions
- What makes this a no bake Oreo cheesecake?
- Do I need to remove the cream from the Oreos for the crust?
- Why won’t my no bake Oreo cheesecake hold up?
- Why is my no bake cheesecake grainy?
- Can I make this cheesecake in a pie dish?
- More Cheesecakes
- FAQs
- Do you need to remove the cream from Oreos for the crust?
- How do you fix a no-bake Oreo cheesecake that won’t set?
- How long does no-bake Oreo cheesecake last in the refrigerator?
- Can I use a different crust for this Oreo cheesecake?
- How do you fix a no-bake Oreo cheesecake that won't set?
- No Bake Oreo Cheesecake
- Ingredients
- Instructions
- Last Step:
- Nutrition
- Did you make this recipe?
Why you’ll love this recipe
A few simple reasons make this dessert a repeat performer in my kitchen.
- No oven needed. The crust and filling both set in the refrigerator, so you never turn on the oven.
- Oreos in two places. Crushed cookies build the crust and chopped cookies go into the creamy filling.
- Made ahead. It can be assembled the day before and kept cold until you are ready to serve.
It is the kind of dessert that travels well to a gathering and still looks impressive when you set it down.
Ingredients for no bake Oreo cheesecake
The ingredient list is short and divided into three simple parts: the crust, the filling, and the whipped cream on top.
For the Oreo crust
- 200 g Oreo cookies, about 18 to 20 cookies
- 50 g (1/4 cup) unsalted butter, melted
For the Oreo cheesecake filling

- 450 g (16 oz) full fat cream cheese, brick style such as Philadelphia
- 100 g (1/2 cup) granulated sugar
- 2 teaspoons vanilla extract
- 450 g (1 3/4 cups) heavy cream, cold and full fat
- 15 Oreo cookies, roughly chopped
For the whipped cream
- 200 g (1 cup) heavy cream, cold and full fat
- 2 tablespoons powdered sugar
- 1 teaspoon vanilla extract
Full fat cream cheese matters here. The brick style gives a firmer set than the spreadable tub version, and cold heavy cream whips into the volume that makes the filling light instead of dense. Use the quantities below exactly as written the first time you make it, then adjust the sweetness to your own taste on the next batch.
Tips for this recipe
These small habits are what keep the texture smooth and the slices clean.
- Crush the Oreos finely. A food processor gets the crumbs small enough that the crust holds together, but a zip top bag and a rolling pin work just as well.
- Fold gently. Fold the whipped cream and the chopped Oreo pieces into the cream cheese mixture with a spatula. Gentle folds keep the filling light and smooth.
- Chill long enough. Four hours in the refrigerator is the minimum, and overnight is even better for a firm slice.
- Loosen before unmolding. Run a thin knife around the inside edge of the pan before you release the springform ring so the sides stay neat.
Cold cream, cold bowl, and cold beaters whip faster. If your kitchen is warm, chill the bowl for a few minutes first.
If you are making this for a party, build the cheesecake the day before. The flavor deepens overnight and the slice holds its shape better when you cut it.
How to make no bake Oreo cheesecake
Follow these simple steps and the cheesecake comes together quickly. Prep time is about 20 minutes, then the refrigerator takes over.

Step 1: Make the Oreo crust

- Blend the Oreo cookies in a food processor until finely ground.
- Melt the butter in the microwave or over a double boiler.
- Combine the Oreo crumbs with the melted butter and mix until fully coated.
- Pour the mixture into the bottom of an 8 or 10 inch springform pan, lined with parchment paper if you like.
- Press the crust evenly into a flat layer using the back of a spoon or a glass.
- Chill the crust in the refrigerator while you prepare the filling.
The crust does not need a long rest before the filling goes in, but it should feel firm and cold to the touch. That short stay in the refrigerator keeps the filling from sliding around when you pour it over the top.

Step 2: Make the filling

- In a large bowl, mix the cream cheese, sugar, and vanilla extract. Beat with an electric mixer until smooth and creamy.
- In a separate bowl, whip the cold heavy cream until stiff peaks form.
- Gently fold the whipped cream and the chopped Oreo chunks into the cream cheese mixture with a flexible spatula.
- Pour the filling over the chilled crust and smooth the top with an offset spatula.
- Refrigerate for at least 4 hours, or until fully set.
Once the filling is in the pan, cover it loosely with plastic wrap so the top does not pick up any other flavors from the refrigerator.

Step 3: Add the whipped cream and finish

- In a bowl, combine the cold heavy cream, powdered sugar, and vanilla extract.
- Beat with an electric mixer on medium speed until stiff and fluffy.
- Carefully unmold the cheesecake.
- Transfer the whipped cream to a piping bag fitted with a decorative tip and pipe swirls on top.
- Garnish with whole Oreo cookies and a sprinkle of crushed Oreos.
If you would rather not pipe, spoon the whipped cream over the top and spread it with the back of a spoon. It will taste exactly the same.

Recipe Variations
The base recipe is flexible, and I have tried most of these swaps when I needed a different shape or flavor.
- Change the crust. Graham crackers, digestive biscuits, or chocolate chip cookies can replace the Oreos in the crust.
- Double chocolate. Add melted chocolate to the filling for a richer, darker version.
- Cheesecake bars. Press the crust into a square pan, pour in the filling, and slice once it is fully chilled.
- Mini cheesecakes. Build individual portions in a muffin tin for easy serving at parties.
- Baked version. A baked cookies and cream cheesecake is also an option, and the same batter can be used for mini baked cheesecakes.
For the double chocolate version, add the melted chocolate while it is still warm but not hot, and beat it in just until the color is even.
Whatever shape you choose, keep the chilling time in mind. Bars and minis still need several hours in the refrigerator to firm up, and the crust should always be pressed firmly so the slices hold their shape when you lift them out.
For a party table, the mini version is my favorite. Everyone gets their own little cheesecake, and there is no slicing at the last minute.
Recipe Questions
These are the questions I hear most often when friends make this dessert for the first time.
What makes this a no bake Oreo cheesecake?
Both the crust and the filling set in the refrigerator, so no baking is required at any stage. The cheesecake firms up after a few hours of chilling, which is why the recipe asks for at least 4 hours in the fridge. There is no oven step, no water bath, and no baking time to watch.
Do I need to remove the cream from the Oreos for the crust?
No. Keep the cream filling inside the cookies when you crush them for the crust. It helps bind the crumbs together and adds flavor, so there is no reason to scrape it out.
Why won’t my no bake Oreo cheesecake hold up?
Two things usually cause a soft set. First, use full fat ingredients, especially brick style cream cheese and full fat heavy cream. Second, chill the cheesecake long enough, ideally overnight, so the filling has time to firm up completely.
Why is my no bake cheesecake grainy?
A grainy texture can come from sugar that has not fully dissolved in the cream cheese mixture. Overmixing the filling can cause it as well, so beat just until the mixture looks smooth and then stop.
Can I make this cheesecake in a pie dish?
Yes, a pie dish works well for this cheesecake.
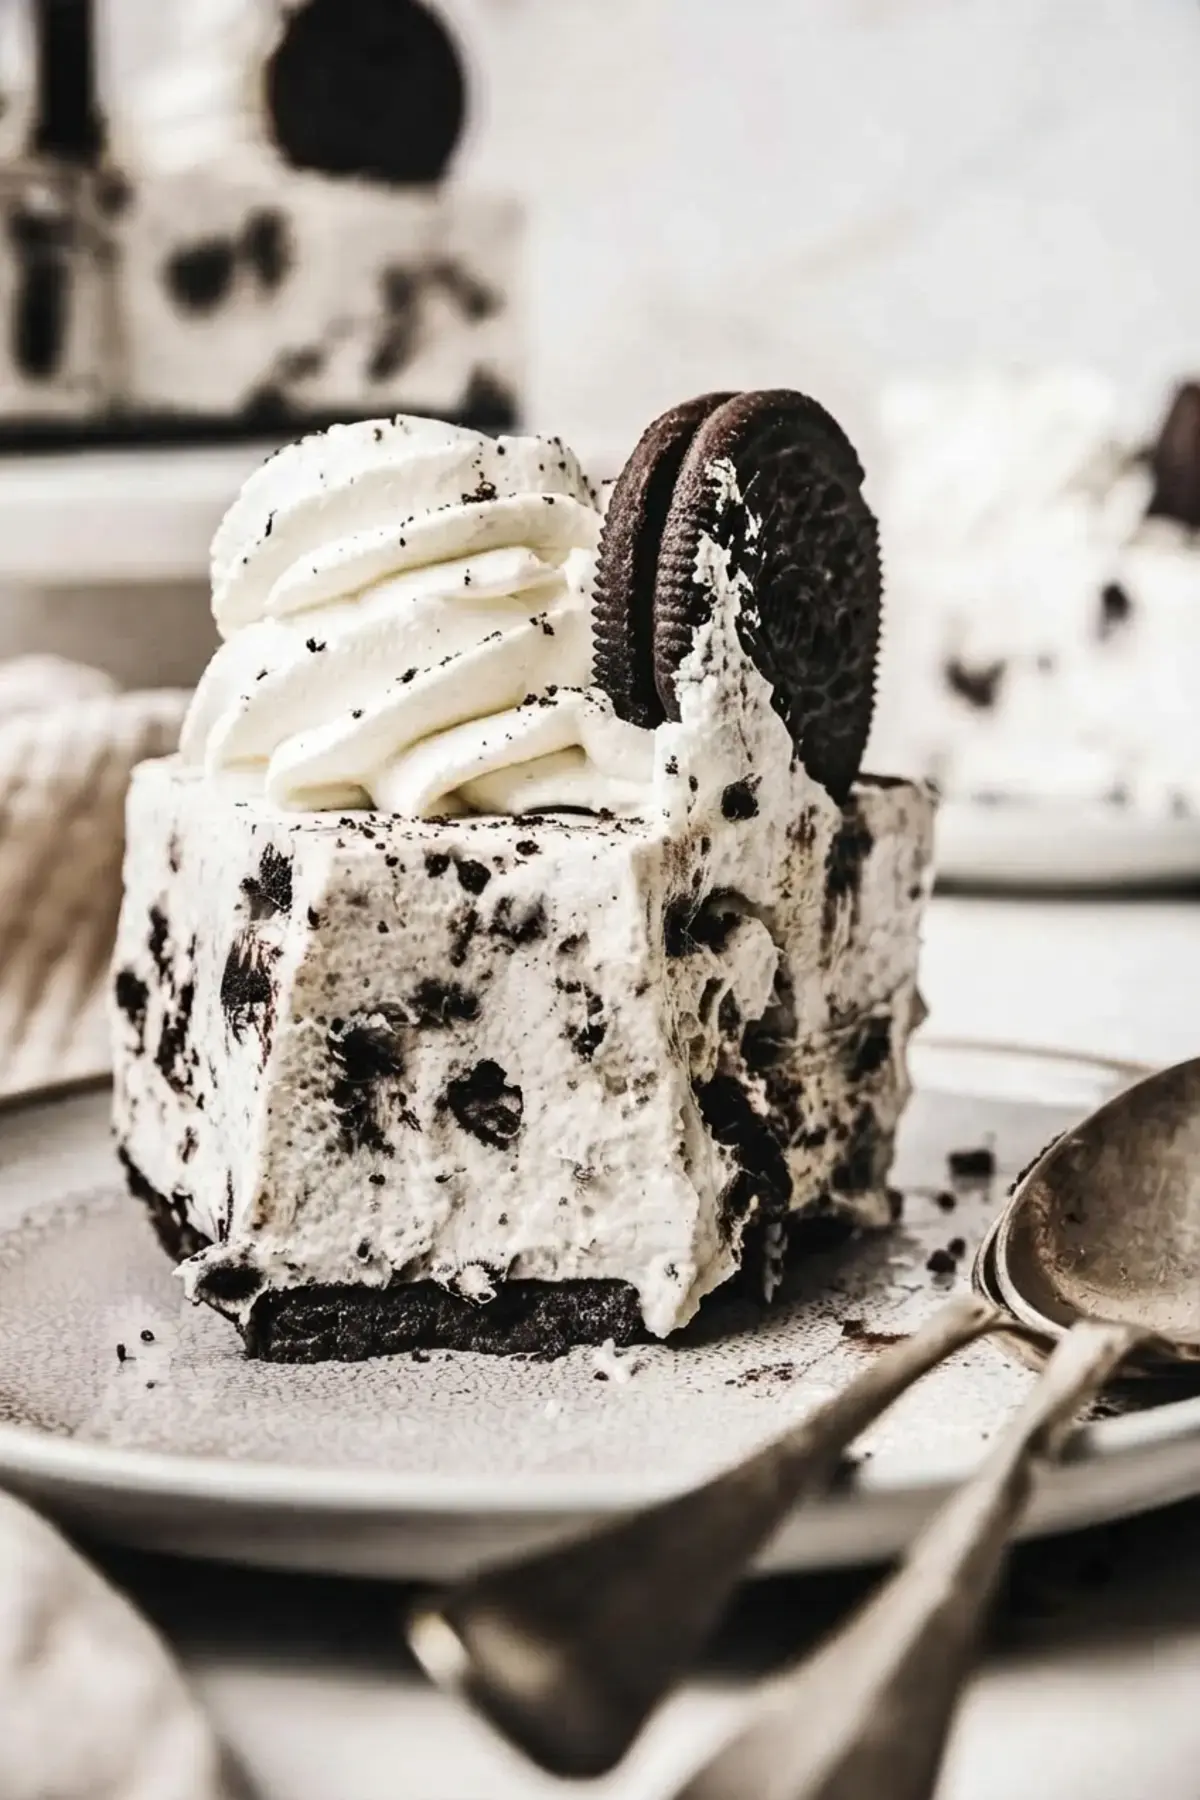
Press the crust evenly across the bottom, and up the sides if you like, then chill as usual. The slices will be a little thinner than a springform version, but the flavor and texture stay the same.
More Cheesecakes
Cheesecake is one of those desserts that never stops being welcome, and this no bake Oreo version is a great place to start.
Once you are comfortable with the crust and the whipped filling, the same technique works with berry toppings, chocolate drizzles, and seasonal flavors.
At my own table, a plain vanilla cheesecake with fresh strawberries shows up just as often as the Oreo one, and both disappear at the same speed.
If you are building a dessert table for a crowd, pair this cheesecake with a fruit salad or a light lemon dessert so guests have something bright alongside the rich slices. Keep everything cold until serving time, and set out a stack of small plates so people can help themselves.
FAQs
Do you need to remove the cream from Oreos for the crust?
No, do not remove the cream from the Oreos for the crust. The cream helps bind the crumbs together with the melted butter and adds extra flavor to the crust. Simply blend the whole Oreo cookies until finely ground.
How do you fix a no-bake Oreo cheesecake that won’t set?
If your cheesecake won't set, the most common cause is under-whipped heavy cream or cream cheese that was too soft. Ensure your heavy cream is whipped to stiff peaks before folding, and use full-fat brick-style cream cheese. Chilling the cheesecake for at least 4 hours, or ideally overnight, is essential for a firm set.
How long does no-bake Oreo cheesecake last in the refrigerator?
No-bake Oreo cheesecake will last up to 5 days when stored in an airtight container in the refrigerator. Because it contains dairy, do not leave it at room temperature for more than 2 hours. For longer storage, you can freeze it for up to 3 months.
Can I use a different crust for this Oreo cheesecake?
Yes, you can swap the Oreo crust for graham cracker crumbs, crushed digestives, or crushed chocolate chip cookies mixed with melted butter. However, using a different crust will significantly change the chocolate cookies-and-cream flavor, so the Oreo crust is recommended for the classic taste.
How do you fix a no-bake Oreo cheesecake that won't set?
If your cheesecake won't set, the most common cause is under-whipped heavy cream or cream cheese that was too soft. Ensure your heavy cream is whipped to stiff peaks before folding, and use full-fat brick-style cream cheese. Chilling the cheesecake for at least 4 hours, or ideally overnight, is essential for a firm set.

No Bake Oreo Cheesecake
No Bake Oreo Cheesecake No bake Oreo cheesecake is the dessert I bring when I want everyone at the table to ask for the recipe before the plates are cleared. It starts with a buttery Oreo crust, then a filling whipped until it looks like a soft mousse and studded with cookie pieces.
- Total Time: 260 min
- Yield: 12 slices 1x
Ingredients
Oreo Crust
200 g Oreo cookies, about 18–20 cookies
50 g unsalted butter, melted
Oreo Cheesecake filling
450 g full-fat cream cheese, Philadelphia
100 g granulated sugar
2 teaspoons vanilla extract
450 g heavy cream, cold and full-fat
15 Oreo cookies, roughly chopped
Whipped cream
200 g heavy cream, cold and full-fat
2 tablespoons powdered sugar
1 teaspoon vanilla extract
Instructions
Oreo crust
1-Blend the Oreo cookies in a food: Blend the Oreo cookies in a food processor until finely ground.
2-Melt the butter in the microwave or: Melt the butter in the microwave or over a double boiler.
3-Combine the Oreo crumbs with the melted: Combine the Oreo crumbs with the melted butter and mix until fully coated.
4-Pour the mixture into the bottom of: Pour the mixture into the bottom of a 8 or 10 inch springform pan (lined with parchment paper if needed).
5-Press the crust evenly into a flat: Press the crust evenly into a flat layer using the back of a spoon or glass.
6-Chill in the fridge while you prepare: Chill in the fridge while you prepare the cheesecake filling.
Oreo Cheesecake filling
7-In a large bowl, mix the cream: In a large bowl, mix the cream cheese, sugar, and vanilla extract. Beat with an electric mixer until smooth and creamy.
8-In a separate bowl, whip the cold: In a separate bowl, whip the cold heavy cream until stiff peaks form.
9-Gently fold the whipped cream and Oreo: Gently fold the whipped cream and Oreo chunks into the cream cheese mixture using a flexible spatula.
10-Pour the mixture over the chilled Oreo: Pour the mixture over the chilled Oreo crust and smooth the top with an offset spatula.
11-Refrigerate for at least 4 hours, or: Refrigerate for at least 4 hours, or until fully set.
Whipped cream frosting
12-In a bowl, combine the cold heavy: In a bowl, combine the cold heavy cream, powdered sugar, and vanilla extract.
13-Beat with an electric mixer on medium: Beat with an electric mixer on medium speed until stiff and fluffy.
14-Carefully unmold the cheesecake: Carefully unmold the cheesecake.
15-Transfer the whipped cream to a piping: Transfer the whipped cream to a piping bag fitted with a decorative tip and pipe swirls on top.
16-Garnish with whole Oreo cookies and a: Garnish with whole Oreo cookies and a sprinkle of crushed Oreos.
Last Step:
Please leave a rating and comment letting us know how you liked this recipe! This helps our business to thrive and continue providing free, high-quality recipes for you.- Prep Time: 20 min
- Cook Time: 0 min
- Method: no_cook
Nutrition
- Serving Size: 1 slice
- Calories: 734
- Sugar: 42.4 g
- Sodium: 417.1 mg
- Fat: 50 g
- Carbohydrates: 66.2 g
- Protein: 6.5 g
- Cholesterol: 108 mg


