Ingredients
– 32 chocolate sandwich cookies
– 4 tablespoons salted butter, melted
– 2 bars (8 oz each) cream cheese, softened to room temperature
– 3/4 cup granulated sugar
– 1/2 cup unsweetened cocoa powder
– 1 cup full-fat sour cream
– 1 cup cherry pie filling
– 8 ounces thawed whipped topping
– 1 cup cherry pie filling
– 3/4 cup heavy whipping cream
– 2 tablespoons powdered sugar
– Chocolate shavings made from a milk chocolate bar
Instructions
1-Step 1: Prepare the Chocolate Cookie Crust Begin by transforming your chocolate sandwich cookies into fine crumbs. Place 32 cookies in a food processor and pulse until you achieve a consistency similar to coarse sand. If you don’t have a food processor, place the cookies in a sturdy resealable bag and crush them with a rolling pin, working in batches if needed. Transfer the cookie crumbs to a medium bowl and pour in 4 tablespoons of melted salted butter. Stir thoroughly until every crumb is coated and the mixture resembles wet sand that holds its shape when squeezed in your hand. This step is crucial because under-mixed crumbs won’t pack properly, while over-wet crumbs will create a soggy base. Press the mixture evenly and firmly into the bottom of a 9-inch springform pan. Use the bottom of a measuring cup or the back of a spoon to create a compact, even layer. Work from the center outward, applying consistent pressure to ensure the crust holds together when sliced. Cover the pan with plastic wrap and place it in the freezer for at least 15 minutes while you prepare the filling.
2-Step 2: Create the Creamy Chocolate Cheesecake Base In a large mixing bowl, combine two bars (16 ounces total) of softened cream cheese, 3/4 cup of granulated sugar, and 1/2 cup of unsweetened cocoa powder. Using an electric mixer on medium speed, beat these ingredients together until the mixture becomes light and fluffy, approximately 3 to 4 minutes. Stop occasionally to scrape down the sides of the bowl, ensuring everything incorporates evenly. The mixture should appear smooth and free of lumps. If you notice any cream cheese clumps, continue beating until the texture becomes uniformly creamy. This foundational step determines the final texture of your cheesecake, so take your time to achieve the right consistency.
3-Step 3: Add Moisture and Tang with Sour Cream Add 1 cup of full-fat sour cream to your cream cheese mixture. Mix on low speed until just combined, being careful not to overbeat. The sour cream adds necessary moisture and creates that signature tangy flavor that balances the sweetness perfectly. Your batter should now have a silky, spreadable consistency with a rich chocolate color.
4-Step 4: Fold in the Cherry Pie Filling This step introduces the signature Black Forest cherry flavor throughout your cheesecake. Gently fold 1 cup of cherry pie filling into your chocolate mixture using a wooden spoon or rubber spatula. The keyword here is gently because you want to distribute the cherries evenly without crushing them or breaking them apart. Use a folding motion rather than stirring: cut through the center of the mixture, scoop along the bottom of the bowl, and flip the batter over itself. Continue until you see cherry pieces distributed throughout but still maintaining their shape. The filling should have visible pockets of cherry and a beautiful marbled appearance.
5-Step 5: Incorporate the Whipped Topping Add 8 ounces of thawed whipped topping to your mixture. Using your spatula, fold it in with the same gentle motion until fully incorporated. The whipped topping adds volume and creates that light, airy texture that distinguishes no-bake cheesecakes from their baked counterparts. Stop mixing as soon as you no longer see white streaks of whipped topping. According to no bake Black Forest cheesecake recipes, this gentle folding technique is essential for maintaining the fluffy texture that makes this dessert so appealing.
6-Step 6: Assemble and Chill the Cheesecake Remove your prepared crust from the freezer and pour the cheesecake filling over it. Use your spatula to spread the filling evenly, creating a smooth top surface. Work from the center outward, and don’t worry about making it perfectly level because you’ll be adding toppings later. Cover the springform pan with plastic wrap, pressing it gently against the surface to prevent a skin from forming. Place the cheesecake in the refrigerator for at least 8 hours or preferably overnight. This extended chilling time allows the flavors to develop and the filling to set properly. Resist the temptation to rush this step because cutting into a cheesecake that hasn’t fully set will result in a runny, disappointing dessert.
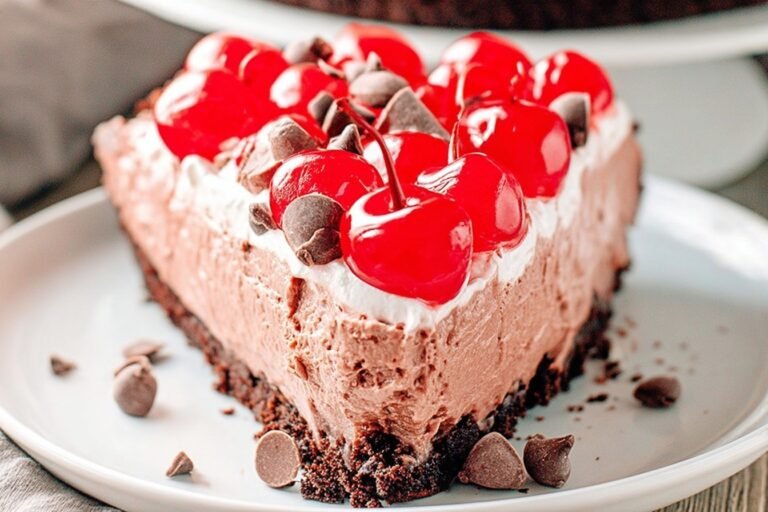
7-Step 7: Add the Finishing Touches and Serve When you’re ready to serve, prepare the toppings. Beat 3/4 cup of heavy whipping cream with 2 tablespoons of powdered sugar using an electric mixer until stiff peaks form. This should take about 2 to 3 minutes on medium-high speed. The cream should hold its shape when you lift the beaters. Transfer the whipped cream to a piping bag fitted with your desired tip and pipe decorative swirls along the edges of the cheesecake. Place the remaining 1 cup of cherry pie filling in the center, creating a beautiful contrast against the chocolate cheesecake and white cream. Finally, create chocolate shavings by running a vegetable peeler along the edge of a milk chocolate bar, allowing the curls to fall onto your cheesecake as decoration. To serve, run a thin knife around the edge of the springform pan before releasing the latch. Slice with a hot knife (dipped in warm water and wiped clean) for the cleanest cuts. This recipe yields 12 generous servings.
Last Step:
Please leave a rating and comment letting us know how you liked this recipe! This helps our business to thrive and continue providing free, high-quality recipes for you.Notes
🧀 Room-temp cream cheese sour cream = lump-free smooth batter.
⏰ Chill 8+ hours sets firm; make 24 hrs ahead max crust crisp.
🍒 Add garnishes right before serving keeps fresh pretty.
- Prep Time: 25 minutes
- Chill: 8 hours
- Category: Dessert
- Method: No Bake
- Cuisine: American
- Diet: Vegetarian
Nutrition
- Serving Size: 1 slice
- Calories: 538 kcal
- Sugar: 32g
- Sodium: 304mg
- Fat: 33g
- Saturated Fat: 18g
- Unsaturated Fat: 12g
- Trans Fat: 0g
- Carbohydrates: 58g
- Fiber: 3g
- Protein: 6g
- Cholesterol: 79mg